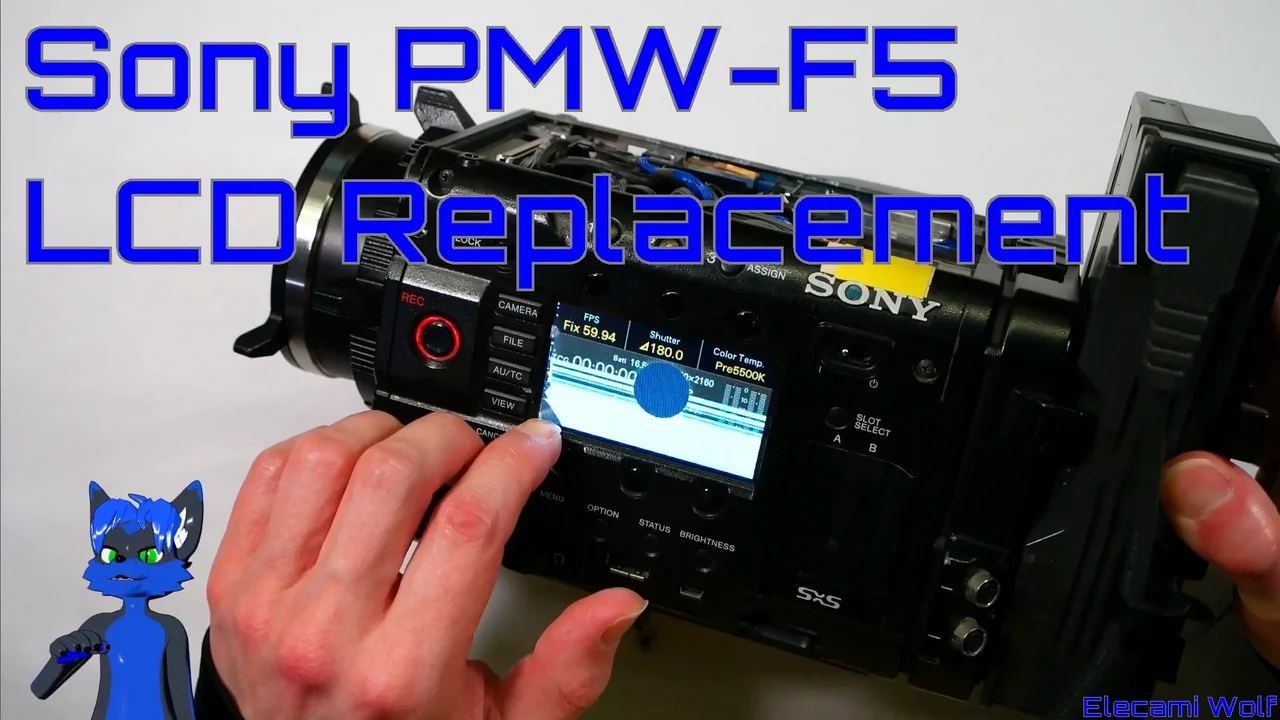
I replace the damaged LCD screen in the Sony PMW-F5 Video Camera that we had done teardown of in the previous video: EW0104 https://youtu.be/IKkPqbgsBX4 Unfortunately things did not go as well as hoped… foolish errors can be very costly. LCD Replacement went well though.
We discuss details of the Nakagin Capsule Tower Building on Tokyo Japan and take a closer look at the Electrical Fittings and the Electronics in the Capsule Rooms.
This turned in to much more of a haphazard mess than I was hoping for. Hopefully it provides some interesting and maybe some little known information about the Nakagin Capsule Tower
Some of the photos used in this video are mine and other have been found from numerous searches online.
Pictures of the Sink Are from:
https://www.youtube.com/watch?v=oLZ4eNL9IgI
A lot of information, pictures and video can be found on this Twitter Page: https://twitter.com/nakagincapsule
Where I found the Model Number of the Speakers: https://twitter.com/ZOH_Pro_TI/status/1476524690814701572
Let's take a look inside some old video cameras.
First the Mitsubishi CC-50 which is probably the camera that goes with the Mitsubishi HS-700 VCR that we looked at in the Previous video: EW0077 https://youtu.be/1BWOxnrElNM
Then the Sharp QC-78 Video Camera, which is another camera that I dug out of the collection and thought would be interesting to take a look at.
Let's look at a W-VHS VCR. Analog High Definition Recording!
A treat for the 80th video.
This Machine, Panasonic NV-WV10 is going to need a bit of mechanical work done to it before we can try a tape in it.
00:00 Brief Introduction to W-VHS and the Tapes.
05:35 First Look at the VCR From Livestream.
11:36 Close up Look at Front & Back of the VCR.
13:25 Look Inside the VCR and Discuss the Problems.
15:32 Look at the W-VHS Technical Guide.
18:57 Look at a D-VHS Service Manual With equivalent Mechanism.
21:17 Mechanical Investigation & Repair Attempt.
33:10 Testing.
If you want to see more electronics and related things, follow me on Twitter: https://twitter.com/ElectricElecami
If you like the videos please consider supporting the channel: https://ko-fi.com/elecami
A look at Plugs & Sockets from around the world with a focus on the Japan Electrical System and how prong holes are used to retain the plugs into the outlet sockets.
Inspired from the Technology Connections Video: "Holey Plugs, Batman! But... what are they for?"
https://www.youtube.com/watch?v=udNXMAflbU8
Sorry slight delay between audio and video. It is the HDMI capture delay, I had not noticed it before making this video.
Demonstrating how to disable and reassemble a Dyson DC30 Vacuum Cleaner for cleaning all the parts.
Then a quick look at the motor and electronics. - Not easy to get into.
00:00 - Disassembly.
05:06 - Assembly.
09:07 - Taking apart the motor area.
13:04 - Putting back the motor.
We have a look inside the Samsung One Connect Cable and try to figure out how it works.
00:00 - The Frame Remote and One Connect Box
01:00 - Investigation of the broken One Connect Cable
12:11 - Opening the One Connect Connectors
19:11 - Close up look at the Transmitters and Receivers
21:51 - Identifying the Fibers
24:09 - Taking a look inside the One Connect Box
I installed a new SSD in the GPD WIN Max 2021 without removing the CPU Heatsink.
This is an example, not a complete how to guide. What you do to your computer is your responsibility.
00:00 - Introduction
00:26 - Screwdriver Selection
01:04 - Remove Screws
02:39 - Remove the Bottom Cover
03:56 - Unscrew Fan - Probably don't need to do this
04:22 - Remove SSD
04:46 - How the New Drive was Prepared
05:18 - Installing SSD
05:48 - Testing and Reassembly
07:55 - Benchmarking new Drive